Brighton Implant Clinic - An award winning dental health clinic


18
Share
Dental Implants
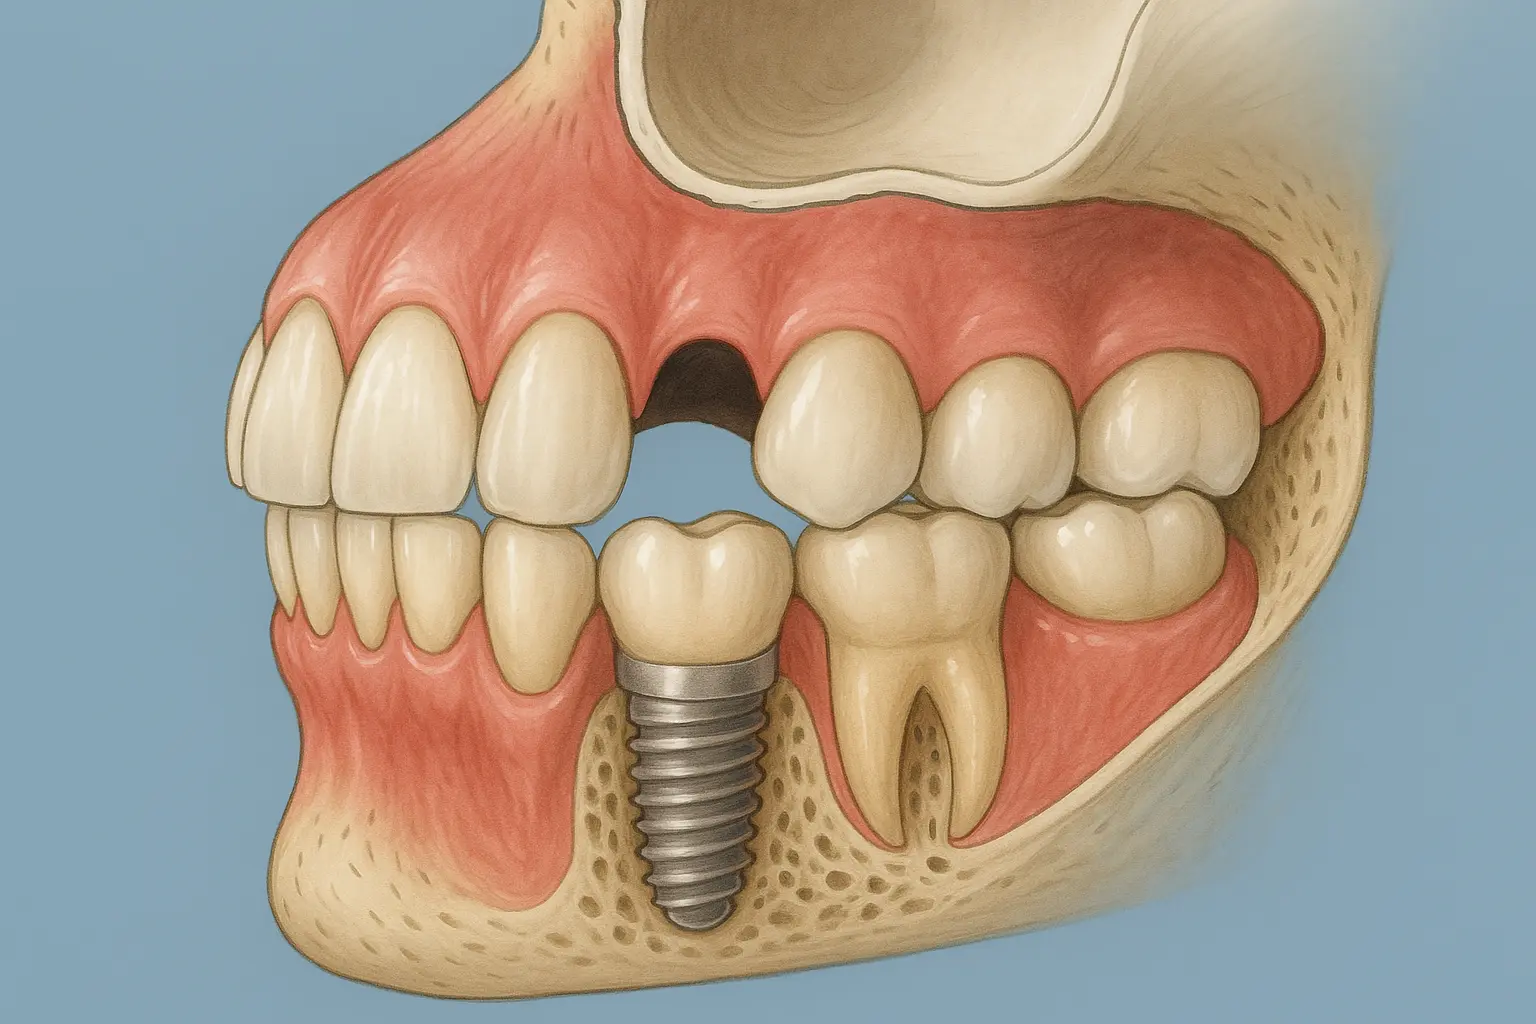
Upper Left Molar Dental Implant: Step-by-Step Guide (+ Case Study)
A missing upper left molar can have a significant impact on your ability to chew, speak, and maintain proper oral health. For many patients, dental implants represent the most reliable and natural-looking solution for replacing a lost molar—especially in the upper jaw, where bone quality and anatomy pose unique challenges.
At Brighton Implant Clinic, we specialize in advanced dental implant procedures and tailor every treatment to deliver long-term success.
Let’s walk through a complete step-by-step guide to getting a dental implant for a missing upper left molar.
Understanding the Importance of the Upper Left Molar
Molars—particularly first and second molars—play a critical role in grinding food efficiently. When an upper molar is missing, it doesn’t just leave a gap; it affects your bite balance, places extra stress on surrounding teeth, and can cause the opposing tooth to over-erupt into the empty space.
This disruption often leads to food trapping, shifting of adjacent teeth, and potential jaw discomfort. The upper left molar, located in the back of the mouth, also borders the sinus cavity, making its restoration especially complex.
Why Choose a Dental Implant for a Missing Molar?
Unlike removable dentures or fixed dental bridges, a dental implant does not rely on neighbouring teeth for support. It is a standalone replacement that mimics the natural tooth root and crown, restoring both function and appearance.
Key benefits of choosing a molar dental implant:
- Preserves jawbone structure by preventing resorption
- Offers superior biting force, similar to natural teeth
- Requires no alteration of adjacent teeth
- Feels and looks like a natural molar
Initial Consultation and Assessment

The first step in your journey is a comprehensive assessment at one of our Brighton Implant Clinic locations. Here, our dental professionals will evaluate your suitability for implant dentistry using a range of diagnostic tools.
Comprehensive Dental Evaluation
We start by reviewing your medical and dental history to identify any risk factors, such as smoking, diabetes, or previous implant failure. A clinical oral exam helps us check the gum health, assess spacing, and identify bone deficiencies.
Diagnostic Imaging
Advanced imaging techniques such as a CBCT scan (cone-beam computed tomography) provide a 3D view of your upper jawbone, sinus location, and nerve pathways. This is particularly important when placing implants in the upper molar area, where the bone height may be limited.
Treatment Planning Tailored to the Upper Molar

Following the initial exam, a personalized treatment plan is developed to address your unique anatomical and dental needs.
Customized Treatment Approach
The upper jaw often has lower bone density and proximity to the maxillary sinus, which sometimes necessitates additional procedures like a sinus lift or bone graft. These procedures increase bone volume and ensure the implant post can integrate securely.
Exploring Replacement Options
You’ll be advised on all your treatment options. These may include:
- Doing nothing, which risks misalignment and oral health decline
- Removable partial denture, which may lack stability
- Fixed dental bridge, which compromises natural teeth
- Single-tooth dental implant, which is conservative and durable
Most patients opt for an implant when seeking a fixed, long-term solution for a missing molar.
Pre-Surgical Preparations
Before surgery, we ensure your oral environment is optimal for implant placement.
Oral Health Optimization
Our hygienists will perform a deep clean to remove plaque, and any decay or gum disease will be treated. This reduces the risk of complications around the implant.
Patient Instructions
We’ll give you a detailed pre-operative guide that may include:
- Adjustments to medications
- Avoiding certain foods or drinks before surgery
- What to expect during recovery
Surgical Procedure: Implant Placement

The dental implant surgery is a minor procedure performed under local anaesthetic at Brighton Implant Clinic.
Anesthesia and Sedation Options
Patients can choose from local anesthesia or conscious sedation to ensure a pain-free, stress-free experience. Most describe the process as comfortable and quicker than expected.
Implant Insertion
A small hole is drilled into the bone, and the titanium implant post is placed. For upper molars, the angle and depth are crucial due to sinus proximity. In our previous patient case, the implant placement was smooth, and the patient reported minimal discomfort post-procedure.
Managing Anatomical Challenges
If bone height is insufficient, a sinus lift may be performed during the same session. Our surgeons are experienced in complex anatomical cases, ensuring the implant is placed with precision.
Healing and Osseointegration
Once the implant is placed, the healing phase begins.
Post-Surgical Healing Phase
Mild discomfort, swelling, or bruising is normal and usually subsides within a few days. We’ll provide aftercare instructions including:
- Using cold compresses
- Taking prescribed anti-inflammatory medication
- Maintaining a soft-food diet for a few days
Osseointegration Process
Over the next 3–4 months, the implant fuses with the jawbone in a process known as osseointegration, creating a solid foundation for the future crown.
Abutment Placement and Impressions

Once the implant is integrated, the second phase begins.
Second Stage Surgery
A small incision is made to expose the implant, and a healing abutment is placed. This helps the gum tissue contour naturally around the future crown.
Dental Impressions
We then take detailed impressions—either digitally or conventionally—to fabricate a custom crown that matches your surrounding teeth perfectly.
Crown Fabrication and Placement
Once your crown is ready, it’s time for the final step.
Designing the Prosthetic Crown
Crowns for molars are typically made from zirconia or porcelain fused to metal, offering durability and a natural look. Colour, shape, and size are all customized for an exact match.
Final Crown Placement
At your final visit, we attach the crown to the abutment—either cement-retained or screw-retained. A radiograph confirms perfect placement. You may notice light pressure on nearby teeth initially, but this settles within a few days.
Post-Placement Care and Maintenance

Your new upper molar implant can last decades with proper maintenance.
Oral Hygiene Practices
- Brush twice daily with a soft-bristled toothbrush
- Floss around the implant using superfloss or interdental brushes
- Use non-abrasive toothpaste to protect gum tissue
Regular Dental Check-Ups
We recommend visiting our clinic every 6 months for professional cleaning and assessment to prevent peri-implantitis (inflammation around the implant).
Comparison of Molar Replacement Options:
Potential Complications and Management
While rare, complications can occur and should be addressed promptly.
Common Issues
- Infection around the implant (peri-implantitis)
- Loose or fractured crown
- Implant failure due to poor osseointegration
Preventive Measures
Following hygiene protocols and regular check-ups are the best ways to minimize these risks. If caught early, most issues can be resolved without removing the implant.
Long-Term Outcomes and Patient Satisfaction
Dental implants have a success rate of over 95% according to the American Academy of Implant Dentistry. Patients report high satisfaction, particularly with upper molar implants that restore both comfort and bite efficiency.
At Brighton Implant Clinic, we’ve helped thousands regain confidence and function through our expert implant dentistry.
Case Study: Replacing a Failed Root Canal with a Dental Implant
At Brighton Implant Clinic, we regularly treat patients with complex dental histories—including failed root canal treatments. One such case involved a patient who presented with a missing upper left molar tooth that had been previously treated with a root canal.
Patient Background and Tooth Loss
The molar in question had been extracted approximately four months prior to their consultation. The patient reported that the root canal, initially performed to save the natural tooth, ultimately failed. This is not uncommon with multi-rooted teeth like upper molars, which may have three to five tiny, often curved canals. Despite the best efforts, it’s possible for one canal to be missed, leading to reinfection and eventual tooth extraction.
Root canal therapy remains an important and effective treatment option for saving compromised natural teeth. However, in molars, due to complex anatomy, treatment success depends heavily on the dentist’s ability to locate and disinfect all canals. At our clinic, we use magnification loupes and microscopes during endodontic and implant procedures to enhance precision.
Healing and Initial Consultation
After extraction, the patient’s gum tissue and jawbone healed well over four months, creating a stable environment for an implant. The patient was eager to explore options for a fixed, natural-looking, and long-lasting replacement for the missing molar. We discussed all viable treatment paths:
- No treatment, which could lead to adjacent tooth drifting or bite imbalance
- A removable denture, which can be uncomfortable and unstable for a single molar
- A fixed dental bridge, requiring removal of enamel from adjacent healthy teeth
- A dental implant, offering a conservative, bone-preserving solution
The patient chose a single tooth dental implant for its long-term benefits and tooth-preserving design.
Implant Procedure and Healing
The implant surgery was performed under local anaesthetic and lasted under an hour. A Neodent titanium implant was placed precisely into the upper left jawbone. Our team selected Neodent for its high-performance design and excellent clinical track record.
Postoperative discomfort was minimal and managed easily with mild pain relievers. Over the next four months, osseointegration occurred—where the bone tissue fused with the titanium implant post, creating a stable foundation.
Crown Placement and Outcome
Once healing was confirmed, we placed a healing abutment and took impressions for the final porcelain crown. The crown was screw-retained—a method that offers easy maintenance and reduces the risk of cement-induced gum irritation.
At the final appointment:
- The crown was affixed securely to the abutment
- The access hole was sealed with Teflon tape and composite resin
- A final radiograph verified proper seating and fit
The patient reported slight pressure from the new crown initially, which subsided within a few days. Within a week, the implant felt like a natural tooth—comfortable, functional, and aesthetically seamless.
Follow-Up and Maintenance
We stressed the importance of daily brushing and flossing around the implant and scheduled regular hygiene visits every 6–12 months. Our team continues to monitor the implant and adjacent teeth, ensuring sustained health and function.
Frequently Asked Questions (FAQs)
How long does a molar implant procedure take from start to finish?
On average, the process takes 4 to 6 months, including healing time between implant placement and final crown delivery.
Will I need a bone graft or sinus lift?
Possibly. If your upper jaw lacks sufficient bone height or is close to the sinus, we may recommend a sinus lift or bone graft before placing the implant.
Is the implant procedure painful?
No. The procedure is carried out under local anesthesia. Most patients report little to no pain, and discomfort after the surgery is manageable with over-the-counter medication.
What’s the difference between an implant and a bridge?
A dental implant is a standalone solution, while a bridge requires shaving down adjacent healthy teeth. Implants also preserve bone, whereas bridges do not.
How long do molar implants last?
With proper care, implants can last 15 years or longer, and many last a lifetime.
Conclusion
Replacing a missing upper left molar with a dental implant is one of the best decisions you can make for your long-term oral health. From diagnosis to final crown placement, Brighton Implant Clinic offers expert care tailored to your needs. Our experience, precision, and patient-first approach ensure that your implant journey is smooth and successful.
If you’re missing a molar and want a lasting, natural-looking solution, contact us at Brighton Implant Clinic to book your free initial assessment, which includes a complimentary panoramic X-ray and treatment plan. Let’s restore your smile and function—one tooth at a time.